A persistent squeak from your rowing machine seat can quickly turn an invigorating workout into an irritating chore. The rhythmic creak, click, or grind disrupts your focus, breaks your flow, and can even signal an underlying issue that, if ignored, might lead to bigger problems. Fortunately, most noisy rowing machine seats can be silenced quickly and effectively with a few simple DIY steps, saving you time, frustration, and potentially costly repairs. This guide will walk you through diagnosing the source of the noise, gathering the right tools, and applying straightforward fixes to restore the smooth, quiet operation of your rowing machine. Get ready to pull those strokes in peace once again!
Understanding Why Your Rowing Machine Seat Squeaks
Before diving into repairs, it’s helpful to understand the common reasons why your rowing machine seat might be protesting with an unwanted noise. Identifying the root cause will streamline your troubleshooting process and ensure you apply the most effective solution.
Common Culprits Behind the Noise
|
Our Picks for the Best Rowing Machine in 2026
As an Amazon Associate I earn from qualifying purchases.
|
||
| Num | Product | Action |
|---|---|---|
| 1 | Rowing Machine for Home, 350 LB Capacity, 16-Level Silent Resistance, Magnetic Rowing Machines for Home Foldable, Full-Body Workout Compact Rowing Machine for Cardio & Strength with APP Support |

|
| 2 | Rowing Machine Magnetic Rower with 16 Resistance Levels, Quiet Home Rowing Machine for Cardio Training, APP Connection, 160 kg Load Capacity, Vertical Storage |
|
| 3 | Rowing Machines for Home, 16 Level Adjustable Resistance, Magnetic Rowing Machine with App Supported, 350 LB Weight Capacity, Upgraded Dual Slide Rails with LCD Data Display Screen |
|
| 4 | Rowing Machine for Home, 16 Resistance Levels, Quiet Magnetic Rower with APP, 350 LB Weight Capacity, Easy Assembly, Compact and Saves Space |
|
| 5 | MERACH Rowing Machines for Home, Magnetic Rowing Machine with 16 Levels, Rower Machine of Quiet Resistance, Dual Slide Rail with Max 350lbs Weight Capacity, App Compatible |
|
| 6 | Rowing Machine for Home, Magnetic Rower Machine, 350 LB Weight Capacity, 16-Level Silent Resistance Row Machine for Gym Exercise Full-Body Workout Compact Rower with LCD Monitor Tablet Holder |
|
| 7 | Foldable Rowing Machines for Home with Adjustable Large Water Tank & Comfortable Seat for Real Experience Immersive Water Rower, APP Link,Joint 0 Impact 330LBS Weight Capacity; |
|
| 8 | Rowing Machine,Wenoker Magnetic Rower Machine for Home,App Supported 350 LB Weight Capacity, Smooth Whisper Quiet with LCD Monitor Tablet Holder & Comfortable Seat Cushion, Compact and Saves Space |
|
| 9 | Rowing Machine,Wenoker Magnetic Rower Machine for Home,App Supported 350 LB Weight Capacity, Smooth Whisper Quiet with LCD Monitor Tablet Holder & Comfortable Seat Cushion, Compact and Saves Space |
|
| 10 | Rowing Machines for Home,Water Rowing Machine with Foldable Design,400LBS Capacity,LCD Monitor,Smooth Glide Rails,Comfortable Seat,Free App(Bluetooth) Supported for Immersive Water Rower&Home Gym |
|
The most frequent offenders behind a noisy rowing machine seat are usually related to friction or loose components. Dirt and debris, such as dust, pet hair, or lint, can accumulate on the seat rail and rollers, creating resistance and a grinding or squeaking sound as the seat glides. Over time, the bearings within the seat rollers can wear out or become dry, leading to friction and noise. Similarly, if the rollers themselves are worn or cracked, they won’t move smoothly. Lastly, loose fasteners, bolts, or screws in the seat assembly can allow parts to shift and rub against each other or the frame, generating an audible squeak or click.
The Impact of a Squeaky Seat
Beyond the immediate annoyance, a squeaky seat can have several negative impacts on your rowing experience and your machine’s longevity. Constant noise can be a significant distraction, making it harder to maintain a steady pace, focus on your form, or enjoy your workout. If the squeaking is due to excessive friction from dirt or worn parts, it can accelerate wear and tear on the seat rollers, bearings, and even the rail itself. Ignoring these early warning signs might lead to more significant damage, potentially requiring expensive replacement parts or professional servicing down the line. Addressing the noise promptly helps maintain your machine’s performance and extends its lifespan.
Essential Tools and Materials for the Fix
Having the right tools and materials on hand before you begin will make the repair process smoother and more efficient. Most items are commonly found around the house or easily purchased from a hardware store.
What You’ll Need to Gather
For most squeaky seat fixes, you’ll need a selection of cleaning supplies and possibly some lubricants. A few clean microfiber cloths are indispensable for wiping down surfaces. Rubbing alcohol or a mild, non-abrasive detergent solution can be effective for stubborn grime. When it comes to lubrication, this is where manufacturer instructions are critical. For general purposes, a silicone-based spray or a PTFE (Teflon)-based dry lubricant is often recommended for metal-on-metal or plastic-on-metal contact points, particularly for bearings. However, it is crucial to consult your rowing machine’s manual first, as some manufacturers (e.g., Hydrow, Peloton) explicitly advise against using any lubricants or degreasers on the seat rail and rollers, as this can cause damage and void your warranty. You might also need a set of Allen wrenches (hex keys) and screwdrivers to tighten any loose fasteners. A flashlight can be useful for inspecting hard-to-reach areas.
Safety First: Precautions to Take
Before you begin any maintenance, always prioritize safety. If your rowing machine has electrical components, unplug it from the power source to eliminate any risk of accidental activation. Ensure your machine is stable and on a flat surface to prevent it from tipping over while you work on it. If you’re using any cleaning solutions or lubricants, it’s wise to wear protective gloves to prevent skin irritation. Always work in a well-ventilated area, especially when using aerosol sprays. By taking these simple precautions, you can ensure a safe and effective repair process.
Step-by-Step Guide to Fixing a Squeaking Rowing Machine Seat
With your tools ready and safety measures in place, you can now systematically address that annoying squeak. Start with the simplest fixes and work your way through the steps, testing for noise resolution after each one.
Initial Inspection and Diagnosis
Begin by actively listening to pinpoint the exact location of the squeak. Sit on the seat and move back and forth slowly, trying to identify whether the noise comes from the rollers, the rail, or another part of the seat assembly. Next, visually inspect the entire seat, wheels, and rail. Look for any visible dirt, debris, hair, or residue. Pay close attention to the track where the wheels run. Also, gently lift the seat and manually rotate each roller, checking for any grinding sounds or excessive wobble, which could indicate worn bearings. Finally, systematically check all visible bolts, screws, and fasteners on the seat assembly for any signs of looseness.
Cleaning the Seat Rail and Wheels
Cleaning is often the most effective and universally safe first step. Using a clean microfiber cloth, thoroughly wipe down the entire length of the seat rail, both on the top surface and along the inside of the track. If there’s visible grime or sticky residue, dampen the cloth with water or rubbing alcohol (if safe for your machine’s materials). Next, focus on the seat wheels. With the seat lifted or removed (if possible, following manufacturer instructions), carefully clean each wheel, removing any accumulated dust, hair, or grit. Ensure all sides of the wheels are spotless. This step alone resolves many squeaks caused by friction from debris.
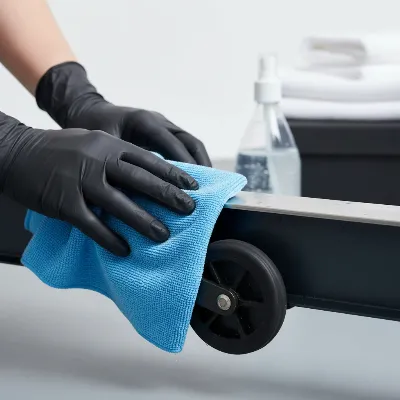 Technician thoroughly cleaning a rowing machine seat rail and wheels with a microfiber cloth and spray bottle.
Lubricating Moving Parts
If cleaning doesn’t resolve the squeak, lubrication might be the next step, but proceed with caution and refer to your manual. For seat wheel bearings, a small amount of silicone spray or a light, all-purpose lubricant designed for plastic and metal may be appropriate. Apply sparingly and wipe away any excess. For the seat rail itself, many manufacturers advise against wet lubricants as they can attract dust and grime, making the problem worse over time. If your manual does recommend rail lubrication, it will likely suggest a dry lubricant (e.g., PTFE-based). Apply a thin, even coat and buff thoroughly to ensure no residue remains that could attract dirt.
Tightening Loose Fasteners
Loose components are another common source of noise. Using the appropriate Allen wrenches or screwdrivers, systematically go through all the bolts, screws, and fasteners that secure the seat to its carriage and the carriage to its rollers. Gently tighten each one until it is snug. Be careful not to overtighten, as this can strip threads, deform components, or cause new stresses that lead to future issues. After tightening, test the seat’s movement to see if the squeak has disappeared.
Addressing Frame Friction (If Applicable)
Occasionally, the squeak might not be from the seat or rail directly but from another part of the seat assembly rubbing against the main frame of the rowing machine. As you move the seat, listen closely for any contact points. If you identify an area where plastic or metal components are rubbing, a small amount of dry lubricant (such as graphite or a PTFE-based spray) on the contact surface might alleviate the friction. Sometimes, a slight adjustment to the assembly can also resolve the issue.
Preventing Future Squeaks: Maintenance Tips
A little proactive maintenance goes a long way in keeping your rowing machine seat operating quietly and smoothly. Establishing a regular cleaning and inspection routine can prevent most squeaks from ever starting.
Regular Cleaning Schedule
The simplest and most effective way to prevent a squeaky seat is consistent cleaning. After each workout, take a moment to wipe down the seat rail and rollers with a clean, dry microfiber cloth. This removes sweat, dust, and any light debris before it has a chance to build up and cause friction. Perform a deeper clean monthly or bi-monthly, using a slightly damp cloth to remove more stubborn grime, ensuring all crevices around the rollers are free of accumulation. This routine not only prevents squeaks but also prolongs the life of your machine’s moving parts.
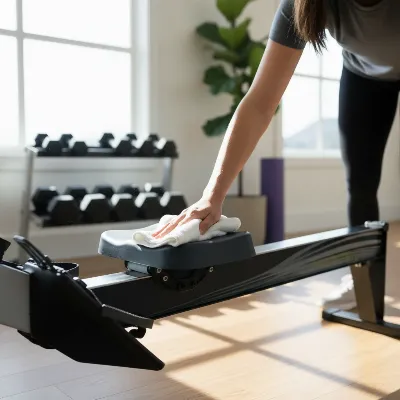 Person wiping down a rowing machine rail and seat after a workout for preventative maintenance.
Proper Lubrication Practices
If your rowing machine’s manufacturer recommends lubrication for certain parts, adhere strictly to their guidelines regarding the type of lubricant and the frequency of application. Using the wrong type of lubricant (e.g., oil-based on a rail designed for dry lubricants) can attract dust and worsen the problem. Mark your calendar for periodic lubrication if recommended, ensuring that rollers and bearings receive attention before they become excessively dry. Remember, for many machines, particularly those with specific rail materials, “no lubrication” is the best lubrication for the rail itself, relying solely on cleanliness for smooth operation.
Periodic Fastener Checks
Just like any piece of exercise equipment, the vibrations from regular use can cause fasteners to loosen over time. Every few months, take a few minutes to systematically check all the bolts and screws associated with your rowing machine’s seat and rail assembly. A quick snugging with the appropriate wrench or screwdriver can prevent components from shifting and rubbing, heading off potential squeaks before they manifest. This simple check is a vital part of preventative maintenance that keeps your machine in top condition.
Troubleshooting Persistent Squeaks and When to Call a Pro
Despite your best DIY efforts, some squeaks can be stubbornly persistent. Knowing when to escalate your troubleshooting or seek professional assistance is crucial.
What to Do If the Squeak Remains
If you’ve cleaned, lubricated (where appropriate), and tightened everything, and the squeak persists, it’s time for a more thorough re-evaluation. Start by re-listening carefully; the sound might be coming from a different part of the machine entirely, such as the flywheel, chain, or footrests, rather than the seat. Re-inspect the rollers for any signs of wear, cracks, or flat spots that might indicate a need for replacement. Consult your rowing machine’s user manual for any specific troubleshooting sections or unique maintenance recommendations for your model. Sometimes, a different type of cleaning agent (e.g., a specific plastic cleaner) or a different lubricant might be recommended by the manufacturer.
Recognizing When Professional Help is Needed
There are instances where DIY fixes simply aren’t enough, and professional help or part replacement becomes necessary. If you observe visible damage to critical components like cracked seat wheels, a bent seat rail, or signs of bearing failure that cleaning or lubrication cannot fix, it’s likely time to order replacement parts or contact the manufacturer. If your machine is still under warranty, always contact the manufacturer’s customer service first, as attempting further repairs yourself might void the warranty. They can provide specific advice, send replacement parts, or arrange for a technician if needed, especially if the issue points to an internal mechanical problem beyond the user-serviceable parts.
Conclusion
A squeaking rowing machine seat doesn’t have to derail your fitness goals or your peace of mind. By systematically cleaning debris, carefully lubricating moving parts according to manufacturer guidelines, and ensuring all fasteners are snug, you can quickly and effectively silence most unwanted noises. Regular maintenance is your best defense against future squeaks, guaranteeing that your rowing machine remains a source of smooth, quiet exercise for years to come. Remember, the goal is a seamless workout experience, allowing you to focus on your rhythm and effort, not on an irritating sound. What’s the most satisfying silent workout you’ve ever had after fixing a persistent machine noise?
Câu Hỏi Thường Gặp
Can I use WD-40 on my rowing machine seat rail?
It is generally not recommended to use WD-40 or similar oil-based lubricants on your rowing machine seat rail, especially on models like Hydrow or Peloton. These lubricants can attract dust and grime, potentially worsening friction and causing long-term damage to the rail or rollers, and may even void your warranty. Always consult your machine’s manual for specific lubrication guidelines.
How often should I clean my rowing machine seat?
To prevent squeaks and maintain smooth operation, it’s best to wipe down your rowing machine seat rail and rollers with a dry microfiber cloth after every workout. A more thorough cleaning, using a slightly damp cloth to remove built-up grime, should be performed monthly or bi-monthly, depending on usage frequency.
What type of lubricant is best for rowing machine wheels?
For wheel bearings, a silicone-based spray or a light, general-purpose lubricant designed for plastic and metal is often suitable. For the rail itself, if lubrication is recommended by the manufacturer, a dry lubricant (such as PTFE-based) is usually preferred to avoid attracting dust. Always check your Rowing Machine’s specific user manual for recommended lubricants.
Why is my rowing machine seat still squeaking after I cleaned it?
If your seat is still squeaking after a thorough cleaning, the issue might be deeper. It could be due to worn-out seat wheel bearings, cracked rollers that need replacement, or loose fasteners in the seat assembly. It’s also possible the noise is coming from another part of the machine, not the seat itself.
Can a squeaky seat damage my rowing machine?
Yes, if a squeaky seat is caused by excessive friction from dirt, worn parts, or misaligned components, it can accelerate wear and tear on the seat rollers, bearings, and the rail. Ignoring persistent squeaks could lead to more significant damage over time, potentially requiring more costly repairs or part replacements.