Replacing the bungee cord on a Concept2 Rower restores optimal handle retraction and rowing performance. This essential maintenance task can be completed at home using basic tools like a 5/32 inch hex wrench and a genuine Concept2 shock cord, typically taking less than an hour for most users. A worn cord causes sluggish handle return, impacting workout efficiency and potentially damaging other machine parts.
Understanding Your Concept2 Rower’s Bungee Cord
The bungee cord, also known as a shock cord, is a critical component in Concept2 Indoor Rower models C, D, and E. Its primary function is to retract the handle and chain smoothly during the recovery phase of each stroke, ensuring consistent tension for the next drive. Without a properly functioning bungee cord, the chain may recoil slowly or not at all, disrupting rhythm and compromising workout effectiveness.
Signs of a worn-out bungee cord include a handle that retracts sluggishly, requires manual assistance to return fully, or shows visible fraying, thinning, or breakage. Users might also find small rubber strands or debris, indicating internal damage to the cord’s elasticity. Addressing these issues promptly improves the rowing experience and prevents potential damage to other machine parts by maintaining proper chain tension.
Essential Tools and Replacement Parts
Before beginning the replacement process, gather the necessary tools and ensure you have the correct Concept2 replacement shock cord for a smoother procedure.
Tools You’ll Need:
- Hex Wrench: Typically a 5/32 inch hex wrench (or a 4 mm hex wrench).
- Combination Wrench: Often a 7/16 inch (or 11 mm) combination wrench.
- T27 6-lobe driver: Some models may require this for certain fasteners.
Replacement Part:
- Concept2 Shock Cord (Bungee Cord): It is highly recommended to purchase a genuine Concept2 shock cord. These are specifically designed for your rower’s model (C, D, or E) and ensure proper length, durability, and performance. You can typically find these on the Concept2 website or by contacting their customer support. While the cost is relatively low, the impact on your rower’s functionality is substantial.
Using an authentic Concept2 part is crucial for ensuring compatibility and maintaining the integrity of your machine. Generic cords may not provide the correct tension or withstand the repeated stress of rowing, leading to premature wear or potential safety issues.
Step-by-Step Guide: Replacing Your Concept2 Bungee Cord
Replacing the bungee cord on your Concept2 Rower is a manageable task if you follow these steps carefully. The process involves some disassembly and careful routing to ensure proper function.
Preparation and Disassembly
- Separate the Rower: Begin by separating the monorail (the part with the seat) from the flywheel end of the rower. Lift the monorail and raise it upwards, allowing the two sections to disconnect. This provides better access to the bungee mechanism.
- Flip the Frame: Carefully flip the flywheel end of the frame upside down. This position exposes the underside where the bungee cord and its pulleys are located.
- Remove the Return Mechanism Cover: Locate the return mechanism cover, typically a black plastic cover at the front end of the frame. Slide this cover out. Be cautious, as there might be some residual tension from the shock cord.
- Release Tension and Disconnect: With one hand, hold the existing shock cord to maintain control. Use your other hand to disconnect the cord from the pulley. Pay close attention to how the cord is connected and routed, as you will need to reassemble it in the same manner. Slowly and carefully release any remaining tension on the old shock cord.
- Remove the End Cap: Loosen the bolt on the end cap just enough to unhook the cord from the frame. You don’t need to completely remove the bolt. Depending on your model, you may need a 5/32 inch hex wrench and a 7/16 inch combination wrench for this step.
- Remove from Traveling Pulley: Detach any “scam pieces” or plastic sleeves from the old shock cord. Then, carefully remove the shock cord from the traveling pulley assembly. The old cord should now be completely free and can be discarded.
Installing the New Bungee Cord
|
Our Picks for the Best Rowing Machine in 2026
As an Amazon Associate I earn from qualifying purchases.
|
||
| Num | Product | Action |
|---|---|---|
| 1 | Rowing Machine Magnetic Rower with 16 Resistance Levels, Quiet Home Rowing Machine for Cardio Training, APP Connection, 160 kg Load Capacity, Vertical Storage |

|
| 2 | MERACH Rowing Machines for Home, Magnetic Rowing Machine with 16 Levels, Rower Machine of Quiet Resistance, Dual Slide Rail with Max 350lbs Weight Capacity, App Compatible |
|
| 3 | Rowing Machine,Wenoker Magnetic Rower Machine for Home,App Supported 350 LB Weight Capacity, Smooth Whisper Quiet with LCD Monitor Tablet Holder & Comfortable Seat Cushion, Compact and Saves Space |
|
| 4 | Foldable Rowing Machines for Home with Adjustable Large Water Tank & Comfortable Seat for Real Experience Immersive Water Rower, APP Link,Joint 0 Impact 330LBS Weight Capacity; |
|
| 5 | Rowing Machine for Home, Magnetic Rower Machine, 350 LB Weight Capacity, 16-Level Silent Resistance Row Machine for Gym Exercise Full-Body Workout Compact Rower with LCD Monitor Tablet Holder |
|
| 6 | Rowing Machine for Home, 16 Resistance Levels, Quiet Magnetic Rower with APP, 350 LB Weight Capacity, Easy Assembly, Compact and Saves Space |
|
| 7 | Rowing Machine,Wenoker Magnetic Rower Machine for Home,App Supported 350 LB Weight Capacity, Smooth Whisper Quiet with LCD Monitor Tablet Holder & Comfortable Seat Cushion, Compact and Saves Space |
|
| 8 | Rowing Machine for Home, 350 LB Capacity, 16-Level Silent Resistance, Magnetic Rowing Machines for Home Foldable, Full-Body Workout Compact Rowing Machine for Cardio & Strength with APP Support |
|
| 9 | Rowing Machines for Home, 16 Level Adjustable Resistance, Magnetic Rowing Machine with App Supported, 350 LB Weight Capacity, Upgraded Dual Slide Rails with LCD Data Display Screen |
|
| 10 | Rowing Machines for Home,Water Rowing Machine with Foldable Design,400LBS Capacity,LCD Monitor,Smooth Glide Rails,Comfortable Seat,Free App(Bluetooth) Supported for Immersive Water Rower&Home Gym |
|
- Install Through Traveling Pulley: Take your new Concept2 shock cord. Find the midpoint of the cord and feed it through the traveling pulley. Ensure both ends of the cord are equal in length before proceeding.
- Route Through Frame: Guide the new shock cord through the frame, following the exact path of the old cord. It’s crucial that each side of the cord goes straight back and is not wrapped around the chain or twisted. Reference any diagrams or notes you took during disassembly to ensure correct routing around the various pulleys at both the bottom and top of the frame.
- Connect to Pulley Axle: Attach the “scam pieces” or plastic sleeves back onto the ends of the new shock cord. Connect these pieces to the pulley axle, mirroring how the old cord was attached. Double-check that the cord paths are untwisted and clear of any obstructions.
Reassembly and Final Checks
- Reinstall End Cap: Secure the end cap back onto the frame, ensuring it hooks onto the top pulley axle. Tighten the bolt using your T27 6-lobe driver or appropriate wrench.
- Reinstall Return Mechanism Cover: Slide the black plastic dust cover back into its slot at the end of the rower. Make sure it’s fully seated and aligned.
- Rejoin Rower Sections: Carefully upright the flywheel frame and reconnect it to the monorail section of the rower. Ensure the connection is secure.
- Test and Adjust: Give the handle a few pulls to test the new bungee cord. The handle should retract smoothly and with consistent tension. If the chain still recoils slowly or inconsistently, re-inspect the shock cord’s path for any twists or incorrect routing. You may also need to adjust the shock cord tension if your specific model allows for it, though a new cord usually provides adequate tension.
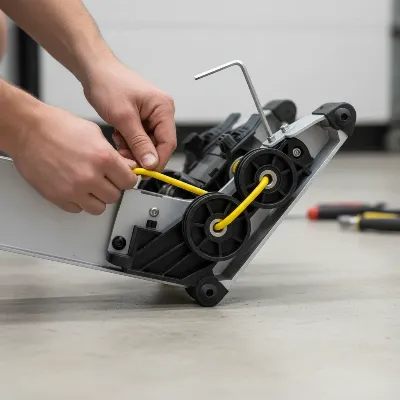 A Concept2 Rower with its frame flipped, showing the internal mechanism and the process of replacing the bungee cord. A person's hands are carefully routing the new cord around pulleys. The image highlights the intricate path of the shock cord and the tools needed, like a hex wrench, in a realistic, well-lit, editorial style.
Maintaining Your Rower for Longevity
Replacing the bungee cord is an important step, but consistent maintenance ensures your Concept2 Rower remains a reliable fitness partner for years to come. Regular inspections and preventative measures can significantly extend the life of your machine and its components.
Periodically, inspect all cords on your rower for any signs of wear, fraying, or damage. Concept2 recommends inspecting these every 500,000 meters of use, or approximately every 50 hours. Beyond visual checks, you should also untwist the cords if you notice them becoming tangled or causing a “lumpy” feeling when you pull on the handles. This twisting can lead to premature wear. To untwist, pull both handles out as far as they go, hold the cords at the top bracket, and allow the handles to spin freely. Run your hand down the length of each cord to encourage untwisting.
Beyond the bungee cord, ensure other vital components receive attention. Regularly clean and oil the chain (every 50 hours of use is a good guideline), wipe down the monorail after each workout, and periodically clean the flywheel to prevent dust accumulation that can reduce drag factor. These simple yet effective practices contribute to a smoother, more durable, and ultimately more enjoyable rowing experience.
Buying Guide: Choosing the Right Concept2 Bungee Cord
When replacing your Concept2 Rower’s bungee cord, the key is to ensure you get the correct, genuine part. Concept2’s “shock cord” is a specific component designed for their rowers, primarily Model C, D, and E Indoor Rowers.
The most important factor is model compatibility. Always verify that the replacement shock cord you purchase is specifically intended for your Concept2 Rower model. While Model C, D, and E often use the same general replacement part, it’s always best to check the product description or consult Concept2’s support page. Using an official Concept2 replacement part guarantees optimal fit, the correct length (typically 380cm or 12′ 6″), and the appropriate elastic properties to provide the consistent handle recoil your rower needs. Avoid third-party generic replacements if possible, as their quality and fit may vary significantly, potentially leading to performance issues or earlier wear. Purchasing directly from Concept2 or an authorized dealer also ensures you receive the latest version of the part and any associated instructions.
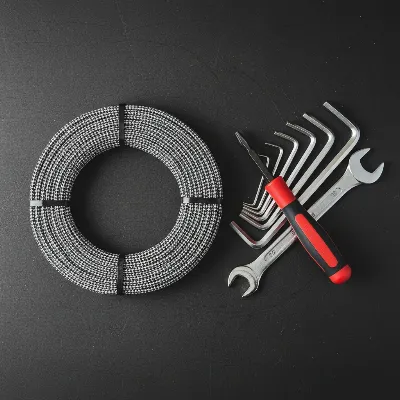 A collection of maintenance tools and a new Concept2 shock cord laid out neatly, ready for rower repair. The tools include hex wrenches, a combination wrench, and the new bungee cord, all on a clean, dark surface. The image emphasizes preparedness and the specific parts needed.
Conclusion
Maintaining your Concept2 Rower is key to ensuring its longevity and consistent performance, and replacing a worn-out bungee cord is a fundamental part of that care. While it might seem daunting at first, following a clear, step-by-step process with the right tools and genuine Concept2 parts makes this a straightforward repair. A healthy bungee cord ensures proper handle retraction, contributing to a smoother, more effective rowing stroke and ultimately, a more satisfying workout experience.
Don’t let a sluggish handle diminish your enthusiasm for rowing. Regularly inspect your rower’s components, especially the bungee cord, and address wear promptly. By taking the initiative to perform this simple maintenance task, you’re not just fixing a part; you’re investing in the continued enjoyment and efficacy of your Concept2 Rower. What other maintenance tasks do you prioritize to keep your rowing machine in top condition?
Replace a Concept2 Rower Bungee Cord
This guide outlines the steps to replace a worn bungee cord on Concept2 Rower models C, D, and E, restoring optimal handle retraction and machine performance.
Separate the monorail from the flywheel end of the rower. Flip the flywheel frame upside down to expose the bungee cord mechanism. Carefully remove the return mechanism cover and release tension from the old shock cord before disconnecting it from the pulley and removing the end cap.
Take the new Concept2 shock cord and feed its midpoint through the traveling pulley, ensuring both ends are equal in length. Guide the cord through the frame, following the exact path of the old cord, making sure it is not twisted or wrapped around the chain. Attach the plastic sleeves to the ends of the new shock cord and connect them to the pulley axle.
Secure the end cap back onto the frame and reinstall the return mechanism cover. Reconnect the flywheel frame to the monorail section of the rower, ensuring a secure connection. Test the new bungee cord by pulling the handle a few times; it should retract smoothly and with consistent tension. Re-inspect for twists if the chain recoils slowly.
Equipment that holds up past 60 sessions
Free PDF — 60-session wear log template + 5 treadmills compared.
The guide was helpful for understanding the importance of the bungee cord for handle retraction. My Model E was definitely showing signs of a worn-out cord. I followed the steps, but I had a bit of trouble with one of the knots. It took me longer than an hour, but I got it done eventually. Still, it’s working better now.
I was so glad to find these instructions! My Concept2 Model D was having really sluggish handle return, and I thought I’d have to pay for a service call. Following the steps for replacing the bungee cord was straightforward, and it really did take less than an hour. My rower feels brand new again, totally worth the small effort.
Good advice here. I’ve had my Concept2 for years and never thought about the shock cord until the chain started recoiling slowly. I ordered a genuine Concept2 shock cord and used my own 5/32 inch hex wrench. The process was pretty simple, though getting the old cord out was a bit fiddly. Definitely improved my workout efficiency.
This was exactly what I needed! My Concept2 rower’s performance was really suffering because the handle wasn’t retracting smoothly. I was worried about damaging other parts, so I decided to tackle the bungee cord replacement myself. The instructions were clear, and now my rower is back to optimal performance. Highly recommend doing this maintenance.