Bringing a new fitness machine into your home is an exciting prospect, especially when it’s a water rowing machine that promises a full-body workout and the soothing sound of flowing water. The satisfaction of assembling it yourself, ensuring every part is secure and ready for action, adds another layer to this journey. This comprehensive guide will walk you through the DIY assembly of your water rowing machine, emphasizing safety, efficiency, and crucial post-assembly checks, to guarantee a long-lasting and effective fitness experience.
Rowing Machine: Overview and Benefits
Rowing machines, often called ergometers, simulate the action of rowing a boat on water, offering one of the most comprehensive full-body workouts available. From their early mechanical designs to today’s sophisticated models, they’ve become a staple in home gyms and fitness centers alike. While there are various types – air, magnetic, and hydraulic – water rowing machines stand out for their ability to closely mimic the feel of rowing on actual water, providing smooth, consistent resistance that adjusts to your effort. The natural sound of water sloshing within the tank also adds a unique, calming auditory element to your workout, enhancing the overall experience. Engaging over 85% of your body’s muscles, regular rowing provides significant cardiovascular benefits, builds strength across major muscle groups including legs, core, and upper body, and is a low-impact exercise, making it suitable for almost all fitness levels and ages.
Understanding Your Water Rower Before Assembly
Before you even unbox your new equipment, taking a moment to understand your specific water rowing machine model and prepare your space can make the assembly process much smoother and safer. While this section isn’t about choosing a machine, it’s about preparing for the one you already have.
Identifying Your Needs and Training Goals
Even though you’ve already selected your water rower, reviewing its manual helps you understand its unique features and any specialized assembly steps it might have. Pay attention to details like monitor connectivity, folding mechanisms, or specific care instructions mentioned early on. This proactive approach ensures you’re aware of any particular requirements or settings specific to your model.
Exploring Different Rowing Machine Types
Your choice of a water rower means you appreciate a natural, fluid resistance. Unlike air rowers that use a flywheel or magnetic rowers that rely on magnets for resistance, water rowers use a flywheel immersed in a tank of water. This self-regulating resistance system means the harder you pull, the more resistance you generate, closely replicating the dynamics of rowing on water. Most water rowers do not require an electrical outlet, which offers greater flexibility in placement, unless your model features an advanced, powered monitor.
Key Factors to Consider
|
Our Picks for the Best Rowing Machine in 2026
As an Amazon Associate I earn from qualifying purchases.
|
||
| Num | Product | Action |
|---|---|---|
| 1 | Rowing Machine,Wenoker Magnetic Rower Machine for Home,App Supported 350 LB Weight Capacity, Smooth Whisper Quiet with LCD Monitor Tablet Holder & Comfortable Seat Cushion, Compact and Saves Space |

|
| 2 | MERACH Rowing Machines for Home, Magnetic Rowing Machine with 16 Levels, Rower Machine of Quiet Resistance, Dual Slide Rail with Max 350lbs Weight Capacity, App Compatible |
|
| 3 | Rowing Machine,Wenoker Magnetic Rower Machine for Home,App Supported 350 LB Weight Capacity, Smooth Whisper Quiet with LCD Monitor Tablet Holder & Comfortable Seat Cushion, Compact and Saves Space |
|
| 4 | Foldable Rowing Machines for Home with Adjustable Large Water Tank & Comfortable Seat for Real Experience Immersive Water Rower, APP Link,Joint 0 Impact 330LBS Weight Capacity; |
|
| 5 | Rowing Machine Magnetic Rower with 16 Resistance Levels, Quiet Home Rowing Machine for Cardio Training, APP Connection, 160 kg Load Capacity, Vertical Storage |
|
| 6 | Rowing Machine for Home, 16 Resistance Levels, Quiet Magnetic Rower with APP, 350 LB Weight Capacity, Easy Assembly, Compact and Saves Space |
|
| 7 | Rowing Machines for Home, 16 Level Adjustable Resistance, Magnetic Rowing Machine with App Supported, 350 LB Weight Capacity, Upgraded Dual Slide Rails with LCD Data Display Screen |
|
| 8 | Rowing Machine for Home, Magnetic Rower Machine, 350 LB Weight Capacity, 16-Level Silent Resistance Row Machine for Gym Exercise Full-Body Workout Compact Rower with LCD Monitor Tablet Holder |
|
| 9 | Rowing Machine for Home, 350 LB Capacity, 16-Level Silent Resistance, Magnetic Rowing Machines for Home Foldable, Full-Body Workout Compact Rowing Machine for Cardio & Strength with APP Support |
|
| 10 | Rowing Machines for Home,Water Rowing Machine with Foldable Design,400LBS Capacity,LCD Monitor,Smooth Glide Rails,Comfortable Seat,Free App(Bluetooth) Supported for Immersive Water Rower&Home Gym |
|
Before assembly, ensure you have an appropriate space. Water rowing machines typically measure between 7 to 9 feet long and 2 to 3 feet wide. You’ll need additional clearance of at least 2 feet on each side and about 4 feet behind the machine to allow for a full range of motion during use. Choose a dry, level area away from moisture. Placing a rubber mat or wooden board beneath the assembly area and later under the machine will protect your floor from scratches or indentations and enhance stability, while also helping to reduce noise and absorb vibrations.
Assembling Your Water Rowing Machine: A Step-by-Step Safety Guide
Assembling your water rowing machine can be a straightforward DIY project with careful preparation and attention to detail. Always prioritize safety and follow your machine’s specific instruction manual, as steps can vary slightly between brands.
Preparation for Assembly
The first crucial step is to read your owner’s manual from cover to cover. This document contains vital safety warnings, a complete parts list, and specific assembly instructions for your model. Next, clear a dedicated space for assembly, ensuring it’s dry, level, and free of obstructions. A 2-meter radius around the machine is recommended during setup. Unbox all components carefully, laying them out in an organized manner. Compare each piece against the parts list and exploded diagram in your manual to confirm everything is present. Most water rowing machines, like the WaterRower, include a 5mm Allen key for assembly, but having a standard screwdriver and a small wrench or socket set on hand might prove useful for other models.
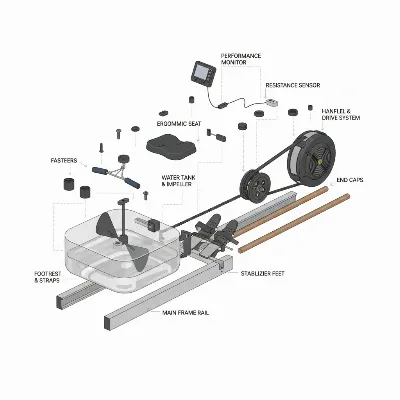 Exploded view of water rowing machine components for DIY assembly
Step-by-Step Assembly
1. Connecting the Rails and Rear Stabilizer: Begin by laying the rails on the floor. Attach the rear spacer or stabilizer to the ends of the rails, typically using female JCN nuts and bolts. Ensure the rails are correctly oriented; for instance, if your seat has a V-shape, it should face the rear spacer.
2. Installing the Seat: Carefully place the seat assembly onto the rails. The larger vertical wheels (load wheels) should rest on the plastic extrusions on top of the rails, while the smaller horizontal wheels (guide wheels) should fit between the rails. You might need to gently separate the rails slightly to allow the guide wheels to settle into place.
3. Positioning the Tank Assembly: Place the pre-assembled tank unit between the rails. Secure it to the main frame or forward riser brackets using the appropriate bolts and nuts, ensuring the nuts are typically on the inside and the bolts on the outside for a clean finish and secure hold.
4. Attaching the Footboard and Footpads: Mount the footboard to the front of the tank assembly. Sometimes, it may be necessary to slightly loosen bolts on the top deck of the machine to create enough clearance for the footboard to fit correctly. Screw in the handle rests, but only partially for now, as they might need final adjustment later. Adjust the heel rest position to your preferred comfort, which is crucial for proper rowing technique.
5. Setting Up the Handle and Belt System: Locate the recoil belt, which is usually wrapped around a bracket near the tank. Release it and connect the bungee cord to the recoil belt’s D-ring. It’s essential to ensure the recoil belt passes smoothly and centrally over all guide pulleys. This step is vital for the proper function of your machine’s resistance and recovery.
6. Connecting the Monitor/Console: If your water rower comes with a separate monitor or console, connect any sensor wires as indicated in the manual. Then, securely attach the monitor to its designated bracket using the provided screws. Some monitors might be pre-assembled.
7. Filling the Water Tank: This is a distinctive step for water rowers. First, remove the rubber bung from the water tank. Use the provided siphon pump to fill the tank. It is highly recommended to use ordinary municipal tap water, as it contains additives that help deter algae growth. Avoid distilled or purified water unless specifically instructed by your manufacturer, as these often lack the necessary additives and can promote algae. Do not overfill the tank; consult the water level gauge on the side of the tank, typically with a maximum fill line around 18-19 liters. Overfilling can risk leaks and may even void your warranty. Once filled, add any purification tablets supplied with your machine, especially if using non-municipal water or as part of a six-month maintenance routine. Reinsert the rubber bung securely, moistening it slightly can aid in placement.
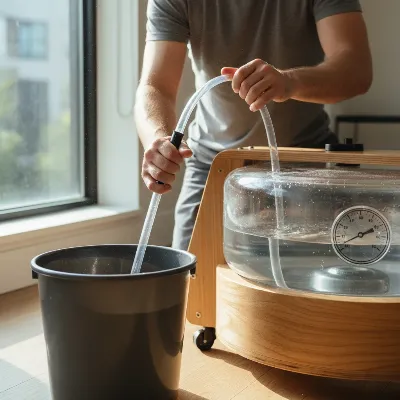 Person safely filling a water rowing machine tank with municipal water using a siphon pump
Final Checks
Once all components are assembled and the tank is filled, go around your machine and gently tighten all nuts and bolts, working systematically. Avoid overtightening, particularly with wooden models, as the wood will adjust to your environment’s temperature and humidity over the first few weeks of use. Confirm that all connections are secure, the recoil belt moves freely, and there are no wobbly parts. Finally, remove all packaging materials and tools from your workout area. Your water rowing machine is now ready for its inaugural row!
Comparison of Popular Rowing Machine Types
While this guide focuses on water rowers, it’s helpful to briefly acknowledge the distinctions among different rowing machine types, especially since you’ve chosen a water-based model. Water rowers excel in replicating the authentic sensation of rowing, thanks to their unique flywheel-in-water system. This provides a smooth, fluid stroke with resistance that naturally increases with your effort, offering a more organic feel than the sometimes jerky motion of hydraulic rowers or the harsher resistance of certain air models. The characteristic swish of water also creates a more engaging and less mechanical soundscape compared to the whoosh of an air rower. Magnetic rowers offer quiet operation and consistent resistance, but often lack the fluid, progressive resistance curve that water rowers provide. Understanding these nuances underscores the unique appeal and specific assembly considerations for your chosen water rowing machine.
Where to Purchase and Top Brands
When acquiring a water rowing machine, you typically find them through various channels, from large online retailers to specialized fitness equipment stores. Well-regarded brands in the water rowing machine market include WaterRower, Concept2 (though primarily known for air rowers, some offer water options), and NordicTrack. These brands are often lauded for their quality construction, durability, and clear assembly instructions. When purchasing online, always read customer reviews thoroughly and understand the retailer’s return and warranty policies before committing. This due diligence ensures you receive a quality product and have recourse if any issues arise, even during assembly.
Usage and Maintenance Post-Assembly
Proper usage and consistent maintenance are crucial for extending the life of your water rowing machine and ensuring a safe, effective workout.
Correct Usage
Before embarking on any new exercise program, it’s wise to consult a physician, especially if you have pre-existing health conditions. When using your water rower, focus on correct rowing technique: initiate the stroke with your legs, followed by your core and arms. During recovery, reverse the motion – arms first, then lean forward with your back, and finally bend your knees. This coordinated movement engages multiple muscle groups efficiently and minimizes the risk of injury. Always begin with a warm-up and conclude with a cool-down and stretching to prepare your body and aid recovery.
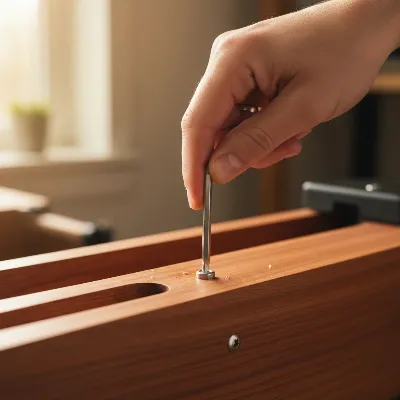 Close-up of a hand gently tightening a bolt on a wooden water rowing machine during maintenance
Maintenance for Longevity
To keep your machine in top condition, wipe down the rails and seat after each use with a damp cloth to remove sweat and dust. Regularly check for dust accumulation, particularly in the clutch and belt mechanism between the top and bottom decks, and clean with a cloth or vacuum. For wooden models, it’s particularly important to gently re-tighten all connecting bolts with the provided Allen key during the first few weeks of use, as the wood adjusts to your environment. Be careful not to overtighten. Periodically check the recoil belt for proper alignment and tension; you may need to adjust the bungee cord if it loosens over time. For the water tank, add a purification tablet every six months or immediately if you notice water discoloration. Never use pool chlorine or chlorine bleach, as these can irreparably damage the polycarbonate tank and void your warranty. If your machine is foldable or designed for upright storage, utilize these features to save space when not in use.
DIY Assembly Guide for Your Water Rower
Successfully assembling your water rowing machine DIY is incredibly rewarding. To recap, several key factors contribute to a safe and effective setup. Always begin by meticulously reading your machine’s instruction manual to understand its unique components and sequential steps. Prepare your assembly area by ensuring it’s clear, level, and protected. When joining parts, take your time and avoid forcing anything. Pay particular attention to the water tank filling process, using municipal water and respecting the maximum fill line, alongside adding purification tablets as directed. After initial assembly, a gentle tightening of all bolts, especially for wooden frames that adjust to environmental humidity, is a crucial first maintenance step. Taking these precautions helps prevent common mistakes like overtightening bolts or incorrect water levels, which can impact performance and warranty.
Frequently Asked Questions
How much space do I need for a water rowing machine?
You generally need an area that is about 7 to 9 feet long and 2 to 3 feet wide for the machine itself, plus an additional 2 feet of clearance on each side and 4 feet behind the machine for a full range of motion during your workout.
Do water rowing machines need electricity?
Typically, most water rowing machines do not require electricity as their resistance system is purely water-based. However, models with advanced digital monitors or smart features might need to be plugged in to power these components.
Can I put a water rowing machine on carpet?
Yes, you can place a water rowing machine on carpet. For optimal stability, floor protection, and noise reduction, it is highly recommended to use a dedicated rowing machine mat underneath, especially on thick carpets.
What tools are needed for assembly?
Most water rowing machines come with all the necessary tools for assembly, often a 5mm Allen key. Having a basic household screwdriver and a wrench or socket set nearby can also be helpful for certain models.
How often should I add a purification tablet to the water tank?
It is generally recommended to add a purification tablet to your water tank every six months. You should also add one immediately if you notice any discoloration or cloudiness in the water, following your manufacturer’s specific instructions.
Equipment that holds up past 60 sessions
Free PDF — 60-session wear log template + 5 treadmills compared.